Printrbot G2 Board
You can use the G2 board with legacy Printrbot (or other) printers. In most cases, you won’t have to write code or load new firmware to do this, but it will probably require some configuration to get the board running smoothly. This guide documents the settings you may want to change if you are using the G2 board with a printer other than the Simple Pro.
This guide is also useful if you’d like to skip the cloud features of the Printrbot Simple Pro and print directly via USB or with OctoPrint.
G2 Board vs. Legacy Printerboards
Before we get into the details, there are two important differences between this new board (we’ll use the term “G2” on this page) and the older boards that shipped with other Printrbot printers (“Printrboard” on this page):
Marlin vs g2core
First, the G2 board uses the g2core flavor of gcode instead of Marlin.
The g2core code was originally developed to control CNC machines. The G2 board running g2core works great in a CNC machine or a 3D printer.
Marlin code (that runs on older Printrboards) was developed specifically for 3D printing. The flavor of gcode it uses adds many mcodes that are specific to printing. Sometimes, these mcodes support new features that are specific to 3D printers (like controlling the temperature of the hotend). In other cases, the Marlin mcodes are shortcuts for actions that are usually handled on CNC machines with other gcode (like adjusting the z offset for the hotend).
The g2core software supports a special Marlin Compatibility mode. This is turned on by default on G2 boards used in printers. The goal of this mode is to support gcode files sliced for Marlin boards. The g2core team does not intend for this mode to support all mcodes listed on the RepRap wiki.
In most cases, you can reproduce the functionality of unsupported Marlin codes by using gcodes or g2core configuration commands.
Local Persistence
Second, settings you send to the G2 board cannot be saved across resets. Every time you start the G2 board, it loads the same default configuration settings.
The default settings can be changed by compiling the board software with different default values set, but we’re not going to talk about how to do this. You can find detailed instructions for building the firmware here.
The easiest way to make sure the board always runs with the right settings is to include the configuration settings you want to use in the “Start Gcode” section of your slicer. This will load the settings every time you start a print. This page covers what settings you may want to set, and how to configure Cura to use start gcode.
Marlin vs g2core Example: Changing the build size of your printer.
If you upgrade the x-axis on a simple metal printer, you need to change the settings on the control board before it will take advantage of the extra space.
To do this on a Printrboard, you send the following commands:
This tells the software that the x-axis size is now 250mm, and then saves this value to the board permanently.
The G2 board does not support these two commands. If you try to send them to your board, it will return an error.
Instead, we use a g2core command to set maximum travel distance on the x-axis, like this:
This sets the length of the x-axis to 254mm.
If you want to read back the value, you type in “$xtm” at the terminal. On a default board, xtm is 215mm. Even if you change this value with the $xtm command, it will return to the default value when the board is reset.
g2core Command Syntax
In this document, we show commands that start with a “$” symbol. The first example we gave was the $xtm command.
If you send $xtm to the board, it will respond with the current value for this setting.
This isn’t the only way you can send the xtm command: You can also send it like this:
or this:
These commands are all the same, but the syntax you use can affect the order in which the g2core software acts on them.
Details on this are here on the g2core wiki. To (over) simplify, though: when entering commands interactively through a terminal, use the $ syntax. If you want config commands to be executed in the order they appear in the gcode file, wrap them in a M100.1 command.
If you are using these commands in the start gcode section of Cura, you’ll need to wrap your M100 commands in two curly braces, since Cura removes the first set of braces when it reads in the file:
You can put comments in-line with your commands by following a command with a semicolon or parenthesis.:
Additional documentation on command syntax is here on the g2core wiki.
Configuring your Software
Cura
These instructions were written and tested with the latest version of Cura at the time, Cura 3.2.1.
Cura 3.x is a great slicer for the Simple Pro and g2 boards. In order to create gcode files that are optimized for your printer, you will need to set up custom start gcode. We explain how to do this below.
It is possible to print directly from Cura to your printer via USB. This does work with G2 enabled printers (and the Simple Pro), but we (and the Cura developers) don’t recommend printing directly via USB from your computer; it is not as reliable as other methods.
This article provides a short summary, for a more detailed description of how to get a Simple Pro running with Cura, read this article.
Setting Start Gcode
In the preferences menu, select Printers, select your printer, and open
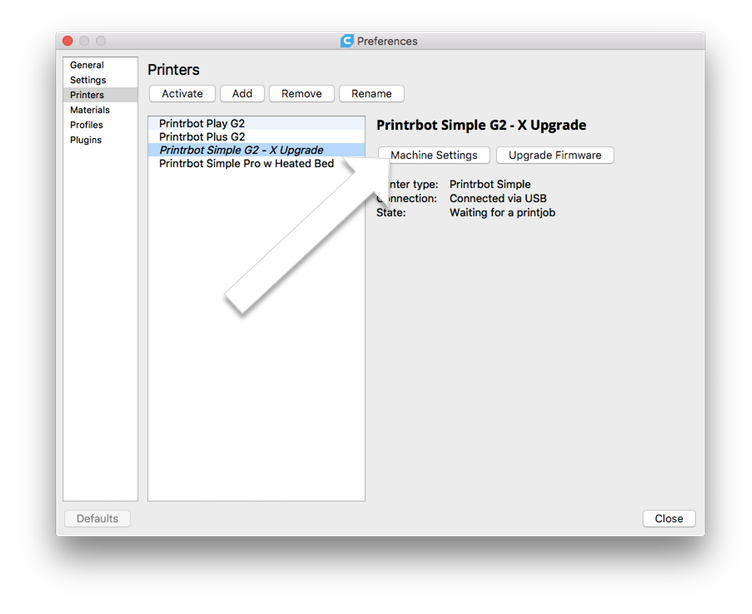
Click Machine Settings on the Preferences Pop-Up
Machine Settings In the machine settings window, there is a “Start Gcode” field.
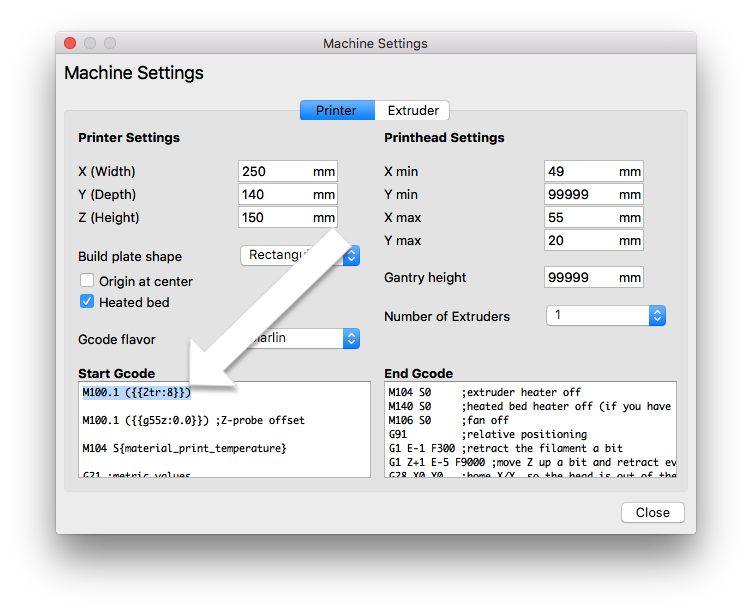
Start Gcode Windows in Machine Settings
Erase what is in that section, and put your Start Gcode in this window.
Cura supports substitution tokens. When Cura reads a token in your gcode, the software replaces it with a value from your slicer settings.
Useful substitution tokens for Cura include:
Because of the way that substitutions work in Cura, setting the heated bed temperature to zero does not disable the heated bed, it instead hangs the printer indefinitely while the g2core board waits for the temperature to drop to zero. To ‘disable’ your heated bed without removing the heated bed commands from your startup gcode, set the bed temperature to slightly above room temperature.
Other Issues
Since Cura uses the same curly brace syntax as g2core, if you are sending commands wrapped in curly braces through Cura, remember to use two sets of curly braces. This means, instead of sending:
You will need to use:
the Cura software will take out the first set of curly braces when it processes the gcode.
There is a known issue with Cura where the homing buttons on the printer controls (under the “Monitor” tab) do not work. The jog controls work fine.
Octoprint
Octoprint works well with the g2core in Marlin compatibility mode “out of the box” with one exception (see the note about disabling log position in the other issues section).
Direct Connection From Cura
Connecting directly to OctoPrint from Cura works well. This guide will not cover configuring this on your system, but you can find instructions here .
Just like with direct USB connection to Cura, the jog controls and printing works fine, but the homing buttons on the controls do not work with the g2core software at this time.
Other Issues
Under OctoPrint Settings:Serial Connection there is an advanced settings tab (look closely at the bottom of the page, it is easy to miss).
Disable “Log position on pause” and “Log position on cancel” features. When these features are enabled, when you pause or stop a print OctoPrint sends the M400 command, which is not supported by the G2 board, which will cause the g2core software to return an error.
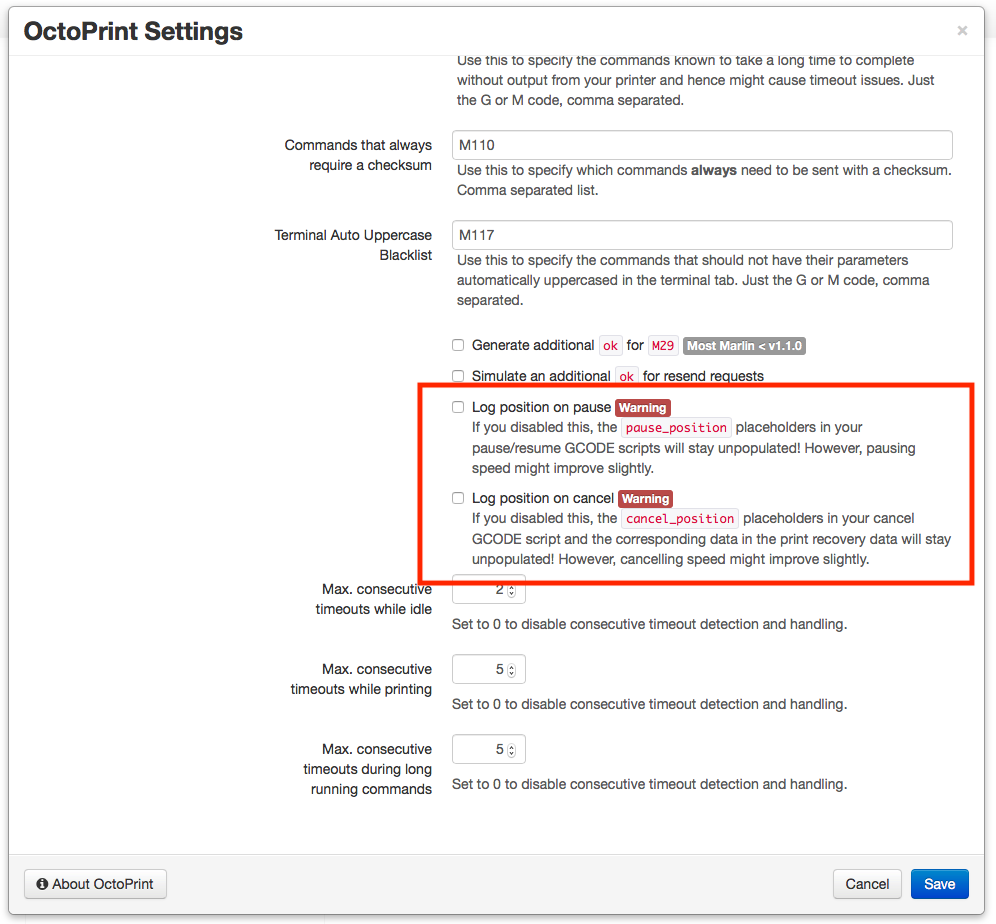
Octoprint Settings
By default, OctoPrint disconnects from the printer if an error code is sent by the board. This shouldn’t happen that often if you have made the change to the pause/cancel settings are changed as described above.
If you are having trouble with prints being ruined when an unsupported code is sent, consider unchecking these settings. As the warning says, this might cause you to miss a serious error.
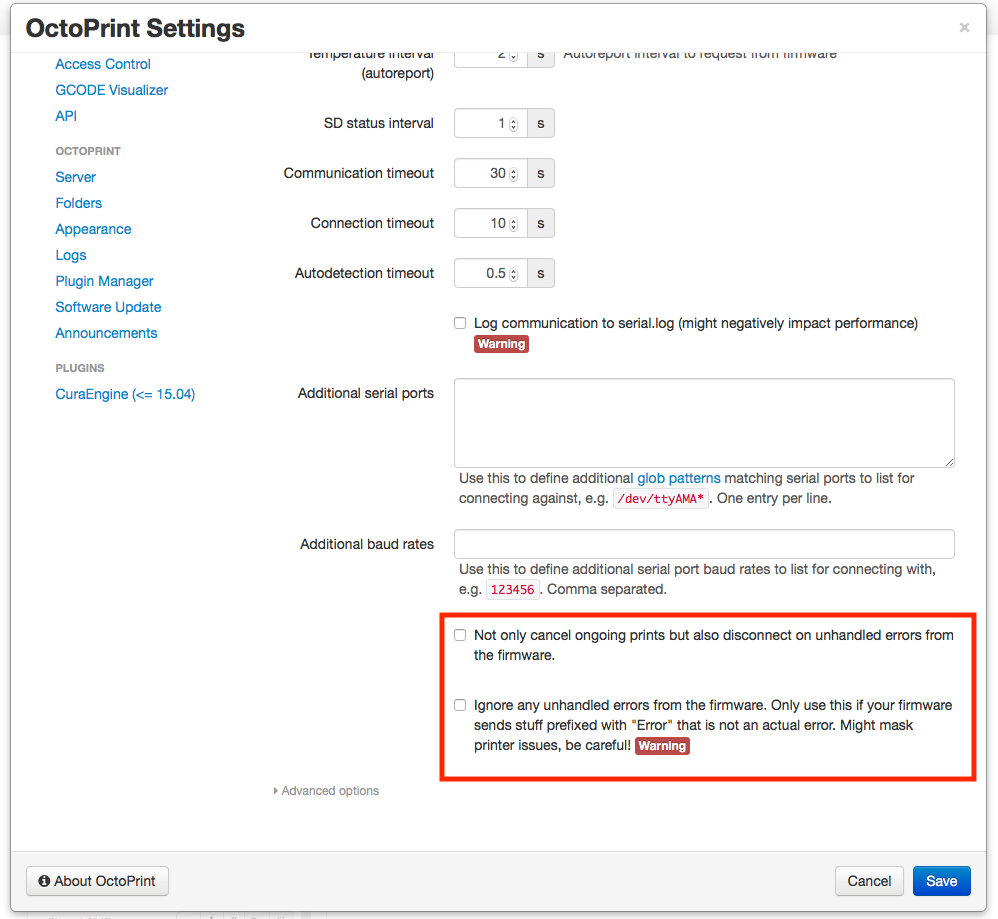
Octoprint Settings
Common Configuration Options In this section, find examples of setting changes for common adjustments, and popular Printrbot upgrades.
Z-Probe Offset
To adjust for z-probe offset, use these commands:
4-Start Lead Screw
To enable the 4-Start Z Upgrade, adjust the travel per revolution of the z-axis. Assuming your z-axis is mapped to motor 2 (the default), use:
If you also installed the super Z upgrade, increase your z-axis size to 240mm:
Gear Head Extruder
In order to set up the gear head extruder, adjust your extruder radius, feed rate and jerk:
Simple Metal Heated Bed
Enable the heated bed:
Don’t forget to insert commands into your start gcode to warm up the bed. In Cura, use:
If you are using this bed, also increase the x-axis size.
Example Start Gcode Sections
General Start Concepts
We use the Startup Gcode to do the following:
* Adjust any settings that aren’t correct by default for your printer
* Home the printer
* Level the z axis (including tramming)
* Adjust z-offset
* Warm up the Heated Bed (if used) and the Hotend
* Prime the hotend by extruding a little filament
The first step, adjusting settings, is not necessary if the configuration options are correct out-of-the box (or if you have recompiled the firmware with settings to match your printer), but it doesn’t hurt to re-send these values.
Stock Simple Metal
Below, find start gcode you can use with a ‘stock’ Simple Metal and Cura.
Remember to replace the Z-offset value with the correct value for your printer before using this code.
Upgraded Simple Metal
Below, find start gcode you can use with a Simple Metal that has been upgraded with Super-Z with 4-start screw, Heated Bed, Gear Extruder. This start gcode has double {{ curly braces }} for use with Cura.
Don’t set your heated bed temperature below room temperature in Cura (using a value of “0” doesn’t work here). If you do this, the printer will wait forever for the bed temperature to reach 0 degrees Celsius.
Remember to replace the Z-offset value with the correct value for your printer before using this code.
Simple Pro
Below, find start gcode you can use with the Simple Pro and Cura.
If you do not have a heated bed, remove the $he3e:t config command and the M190 command in the “Heat” section. Also, if you have a heated bed, don’t set your heated bed temperature below room temperature in Cura (using a value of “0” doesn’t work here)
Remember to replace the Z-offset value with the correct value for your printer before using this code.
g2Core Command Reference
The section below shows commands that may be helpful while adjusting your G2 board. If you’d like to look deeper into this, start here on the g2core wiki.
Heated Bed
To enable the heated bed on your printer, send this command:
After the heated bed is enabled, set the bed temperature as usual with the M140 or M190 commands.
For more details on configuring a heated bed, look here on the g2core wiki.
Build Volume
Adjust the maximum size of your build volume by sending the these commands. As described below sending the command without a value will return the currently configured value.
There is also a minimum axis configuration value that can be set with the $xtn, $ytn and $ztn commands. These values default to 0 and normally, should not need to be adjusted.
The axis values are /soft limits/ - settings that the g2core software respects. (Hard Limits are hit when an endstop switch triggers). If you want the g2core software to stick to these soft limits, you will also need to send the command $sl=1. More details on soft limits can be found here
For more details on configuring build volume in general, look here on the g2core wiki.
Motor Polarity
If a motor is running backwards from what you expect, instead of changing the wires you can switch the polarity in software. Setting polarity to 0 will rotate the motor clockwise (when wired correctly) and 1 will rotate the motor counterclockwise.
See the section on “Motor Axis” for default motor number to axis mappings.
For more details on polarity, look here on the g2core wiki.
Motor Axis
By default with the Simple Printers, the motors are mapped like this:
Motor 1: x-axis Motor 2: z-axis Motor 3: y-axis Motor 4: extruder
You can change this setting in software if your motors are wired differently. Here’s the code we’d use if we wanted to re-map our motors to the default settings:
For more details on motor mapping, look here on the g2core wiki.
Motor Power
The amount of current used to drive the stepper motors is controlled via the Power Level setting. Choose a value between 0 (off) and 1.0 (full power). This represents the percent of maximum current you are sending.
Be very careful when adjusting this value above the default setting (which for most printers, is 0.4). Providing too much current to a motor will reduce performance, add noise, and heat up the motor unnecessarily.
For more detail about setting motor current, check here on the g2core wiki.
Travel per Revolution
Use the travel per revolution setting to specify how much a given axis moves when the motor makes a full revolution. The value is provided in whatever units your printer is configured to use (it should be mm)
This setting is useful to calibrate your extruder and z-axis motors. You set travel per revolution based on the motor number.
For more details on travel per revolution, look here on the g2core wiki.
Feed Rate
Feed rate limits the maximum speed the axis will move during a feed operation.
If the gcode you load into a file specifies a feed rate that is higher than this maximum value, the g2core software will limit it to the value provided here.
The value is measurement units/minute.
Detailed documentation for feed rate can be found here on the g2core wiki.
Rotational Radius
Linear axes (X, Y, Z) focus on linear motion, and the linkage between the motor and linear movement is described by the Travel per Revolution configuration setting.
Rotational axes (A, B and C), that are usually used for extruders, require a radius value. This is used by the g2core software to calculate how far the axis will travel in one revolution of the motor.
Detailed documentation for rotational radius can be found here on the g2core wiki.
Jerk Motion
Set the maximum jerk) for an axis. (Fancy control over jerk is one of the reasons why we like the g2core platform).
Jerk is described in terms of /millions/ of units of measurement per minute cubed.
Detailed documentation for jerk can be found here on the g2core wiki.
LED Control
You can change the color of the LED on the Simple Pro with a special command to the g2core software.
This feature isn’t documented on the g2core wiki, but you can find the source code for the LED control here.
Fan Control
This guide doesn't cover part cooling fan control, yet.
You can indirectly control the settings on the hotend fan with the following settings:
The fan power is a value between 0.0 and 1.0 that represents percent of total power. Many fans don’t work well at power settings less than 0.4. (40%).
Hotend Control
The hotend temperature can be set via Marlin mcodes. You can also use g2core commands to control the hotend:
More detailed hotend configuration settings can be found here on the g2core wiki.
Other Commands
You can get at useful status report from the printer by typing $srinto an interactive terminal. This will update you with the current printer position, hotend temperature, and other details.
If the motors are currently powered and you want to move the printer manually, use the command $md to turn off motors.
If for some reason you want the printer to stop in the middle of a job, you can use the feedhold command by sending the ! command to the printer. To resume printing, use the ~ key.
For more details, type $help into the interactive prompt.